Modding the Inspiron 7570
Not too long ago I purchased the Inspiron 15 7570 laptop from Dell’s outlet website. Having owned the amazing Inspiron 7537 for the past four years I had very high expectations from this machine.
While it’s a really good product in many ways with great specs, I was bitterly disappointed by its remarkably poor screen.
The unpleasant blue tint and the low colour gamut
are a complete eyesore, enough to put off even casual users.
The colour mangling and the banding that can be seen in gradients make this completely unusable for any sort of design.
I’m not sure how Dell even decided on this panel in the first place.
The intrigue
I initially wanted to send it back due to this defect but decided to keep the machine at the last minute.
After a bit of googling around I figured I could replace the LCD panel myself with a much nicer one.
The panel that the laptop uses is a NV156FHM-N35 from the Chinese manufacturer BOE.
Now BOE is a serious competitor to Samsung and LG, but all companies have their fair share of lower-end products.
I’m convinced this is the absolute cheapest panel Dell could possibly source.
The panel I decided to replace it with is from the same manufacturer but with much better specs: The NV156FHM-N61 – a High Colour Gamut screen with 16M colours, much higher Luminance and Contrast. The panel’s connector, voltage, and physical size are identical to the old one. It’s essential to look into these details before ordering a replacement.
The shop
I managed to find this screen on AliExpress from a Chinese seller. While this might not inspire trust to most people, I decided to take the chance. The panel itself was about £40 plus another £12 for transport – so not a tremendous risk. The seller assured me that they’re sending me the exact model I request and not some replacement that they happen to have in stock. The panel arrived well packaged and in perfect condition in about two weeks time (which is fast for China).
The teardown
The teardown is the hardest part of course and one has to be extra careful.
I used a few tools in order to achieve this without irreparably destroying my laptop:
- two spudgers for prying (must be soft plastic! never use a screwdriver)
- a guitar pick
- a Philips screwdriver
- Replacement double-sided 3M tape. I used a 5mm wide one, but you can also use 4mm.
Dell are open about their hardware and have published a very comprehensive service manual for this laptop. This manual is freely available to download from here. Please read this manual together with this post as it has some very good advice. This manual does cover the first part of this teardown in great detail. Unfortunately it does not cover the screen assembly teardown.
You first want to untighten the screws on the backplate. Only the bottom four will come out entirely, the others have stoppers on the other side.
Using the spudger stick carefully begin prying the laptop open. You want to start from the back of the screen where the vents are and slowly work your way around the edges.
The first time you open it it will be a bit harder. The plastic is tightly fit together and will not give so easily, but with enough care you should be able to get it done. Go slowly and never force it open. You should be able to pop the entire bottom plate if you pry around the edges.
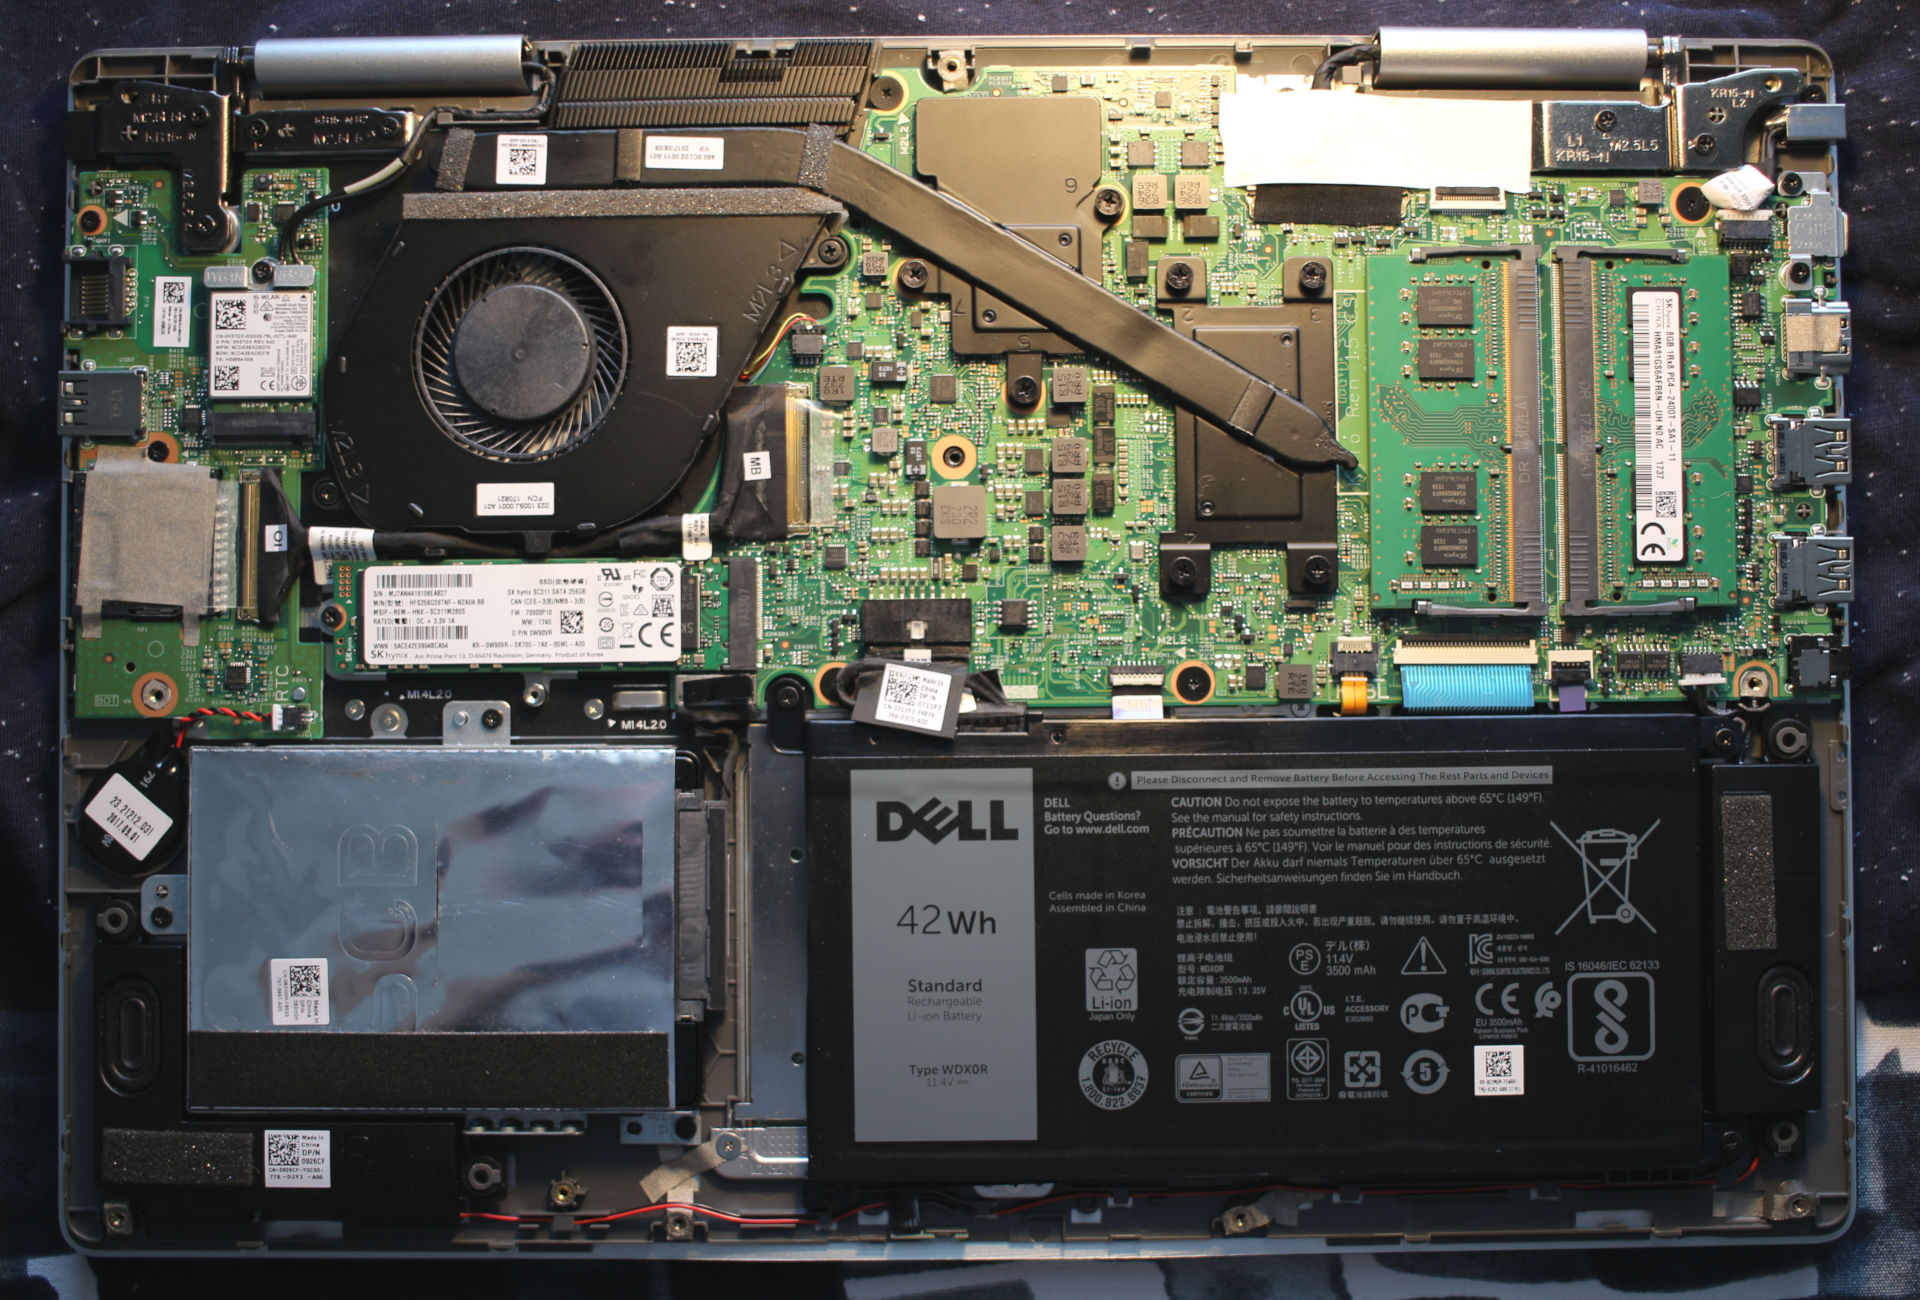
This should be revealed before you if you manage to open the laptop. All its internals are within reach which makes this machine very easy to service.
Screen teardown
What we’re interested in next is the WiFi antenna connector in the upper left hand corner (left of the fan), and the eDP connector of the screen in the upper right hand corner (above DIMM1).
You need to remove the screw and little plate which holds the WiFi card in place, so that the antenna can be removed. You should screw the card back in or remove it completely after this process, so it doesn’t dangle about.
The eDP connector should be removed with extra care as to not damage it. You’re going to be out of luck if you damage this cable as the laptop is new enough that spare parts cannot be found online yet.
Carefully remove the stickers which hold the eDP connector in place and remove the metal latch of the connector. Use the pointy end of the spudger tool (the one that looks like a pencil) on the latch rather than your fingers.
Now remove the remove the two plastic hinge covers with the pointy end of the spudger. These should come off easy. Take note of how the antenna and panel connectors are routed through the hinges.
Place the laptop with the screen open facing down on a soft surface. We’re going to unscrew the hinges next and we want them in an “open” position when the screen is removed.
The hinges are the two solid metal plates you see at the top of the laptop. Untighten the four M2 screws which hold the hinge on the left hand side and the three on the right hand side.
Around the edges
At this point the screen assembly should be completely detached from the rest of the laptop body. Put aside the laptop with its back cover and let’s get working on the screen itself. Take note that advancing beyond this point might void your warranty with Dell.
Using the same technique that you learned in the first part of this tutorial, pry around the edges of the soft plastic frame of the screen. Only this time you will need the guitar pick. The soft plastic is forgiving but again, never force it open.
I recommend starting at the top left hand side and once you get a bit opened with the pick continue with the spudger. At some point you’ll be able to open it using your hands. Go slowly.
One you get to the bottom bit take extra care as this might take a bit longer to come off. I’ve used the spudger extensively here to pry the edges. Never shove the tool inside as this might damage the screen circuit at the bottom of the panel. Take extra care with the webcam bit at the top as well. Even if you swap the panel out, it’s still a good idea to keep the old one around so you want it in a good and reusable condition.
This frame also has some double sided sticky tape which might get damaged in the process of removing it. We’ll replace this tape in the following few steps.
The switcheroo
Congrats, you’ve got to the meat of this tutorial. You should now have the LCD in front of you ready to be changed. The panel is stuck to the back cover of the laptop using two 1cm wide double sided pieces of tape, running from the top of the panel to the bottom. We’ll need to separate the panel from this cover. We’ll also try not to damage this tape as it is essential to holding the LCD into place – and can be easily reused if we don’t stick our oily fingers to it.
Using the spudger (or even two of them) slowly begin to separate the panel from the back cover. Again, do not force it apart. Take your time. Do this on both sides. I would recommend not pulling from the tabs you see at the bottom.
If this is successful you should now have separated the panel. You need to unplug the eDP plug from its back. This also has a metal latch which can be removed using the spudger’s tip. Again, take extra care when handling this cable. Part of it might be stuck to the back of your panel.
Move the new panel in, connect the eDP connector and its latch, and gently press it against the double sided sticky tape from the back once it’s in place. It should easily fit, if it doesn’t check around the edges whether a piece of the WiFi antenna has been caught behind the panel.
There should be some black double-sided tape inside of the frame, about 3mm—4mm wide. If this has been damaged or has too many finger prints you’ll need to change it with a fresh one. Remove the existing tape from the frame and apply a new one. Use tweezers in order to not leave prints on it. Once this is done around all edges press the frame back into the screen cover and gently press on the edges so that the tape sticks to the screen.
The final touch
From this point on you can proceed in doing the steps in reverse order until you get back to a fully assembled laptop. Take extra care when putting the screen assembly back together and plugging the WiFi and panel connectors back in. Remember how the cables were routed.
If you got everything right you should have a fully assembled machine at the end of this, now with a much better screen! The NV156FHM-N61 has great colour reproduction with 100% sRGB coverage and much warmer colours. The new panel also retains its colour accuracy much better than the original when the backlight is dimmed.
All in all this makes this machine much more enjoyable to use, with colours surpassing even my old Inspiron 7537.